Vibrancy, NSAppearance, and Visual Effects in Modern AppKit and SwiftUI Apps
When working with NSVisualEffectView and vibrancy on macOS, it is somewhat common to find yourself in a situation where UI elements are not being rendered as you’d expect them to. Here are the possible problems the addition of vibrancy can cause, reasons behind them, and the tools at our disposal.

When working with visual effects (NSVisualEffectView or the UIKit / SwiftUI equivalents) on macOS, it is somewhat common to find yourself in a situation where UI elements are not being rendered as you’d expect them to. In these situations, the number of debugging tools at your disposal can be pretty limited, and the lack of documentation doesn’t help. I’ll try to outline possible problems the addition of vibrancy can cause for the UI of our macOS apps, reasons behind them, and the tools at our disposal. My focus is on AppKit, but the general rules and principles apply to the other UI frameworks, though the implementation may differ.
Please note this post is not a tutorial on how to accomplish anything. My favorite type of documentation is the one that explains why, not how – which is my goal with this post as well as the reason I love the Documentation Archive so much.
Translucency vs. Vibrancy
Translucency and vibrancy are related, just like NSVisualEffectView and NSAppearance are related, but do not achieve the same goals or fundamentally represent the same concepts.
Apple has helpfully documented the difference between the two concepts here:
Translucency and the blurring of background content adds depth to your interface.
Vibrancy is a subtle blending of foreground and background colors to increase the contrast and make the foreground content stand out visually.
Background vs. Content
Material is associated with translucency, or, in other words, how the contents behind your UI are blurred and blended (note: behind-window vs. within-window blending modes on macOS affect this too) to provide the desired background effect, and therefore translucency is a property of NSVisualEffectView.
NSVisualEffectView’s material really determines the background, i.e. how the contents behind it affect your UI. It does not, on its own, affect how its contents, or anything over it, are rendered. This is why, if you place a view over an NSVisualEffectView, the contents of the view will remain unaffected, and will likely render non-vibrant by default.
If the background blending or colors are not up to your spec, you’ll likely be looking at the properties on your NSVisualEffectView. Note that if you’re using SwiftUI, save yourself some time and bridge NSVisualEffectView using NSViewRepresentable explicitly instead of hoping for the best by using one of the built-in materials.
NSAppearance
On the other hand, NSAppearance affects how the contents of a view are rendered, and therefore the vibrancy of your UI contents.
- Appearance is propagated downstream through the view hierarchy.
- Appearance is inherited from the superview by default.
Some views, like NSVisualEffectView, use an explicit appearance, and therefore affect any of their descendants that inherit their appearance.
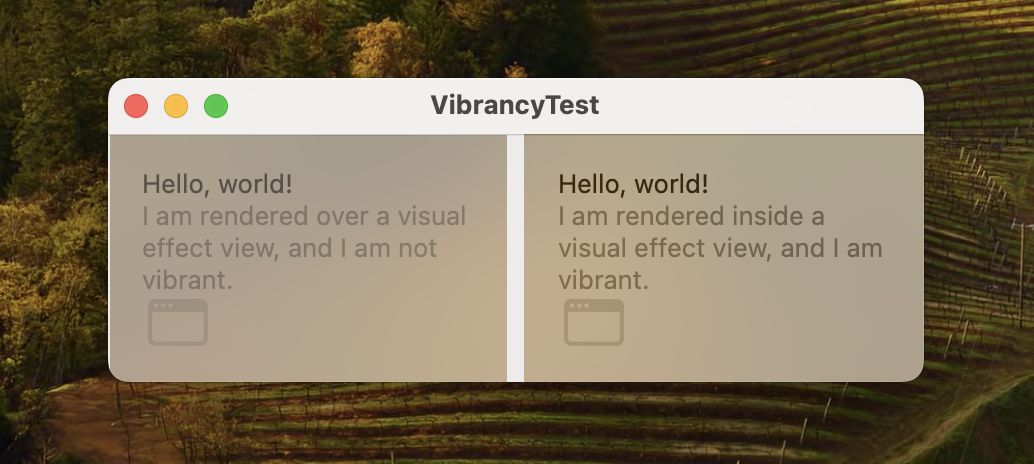
To observe this behavior, set up a standard NSWindow with an instance of NSVisualEffectView as its content view or as a descendant of the content view, and try adding a label text field using a non-primary text color as a subview of an NSVisualEffectView. Now add it overlaid on top of NSVisualEffectView, and observe the difference. In the former case, the label will use a vibrant appearance. In the latter case, it will use the non-vibrant Aqua appearance. This is a simple yet powerful observation that can be used to make our UI look right.
Supporting Vibrancy
Most built-in views and controls in AppKit (and by extension, in SwiftUI) support vibrancy, which means they would look appropriate when using a vibrant appearance. Try adding an NSButton to a menu or a popover, for example.
If you are implementing custom views and controls that do their own drawing, and are expecting them to get the same treatment, you will need to override the allowsVibrancy property to tell AppKit whether your view can be rendered using a vibrant appearance or not.
But wait! Do not override this property on standard views or controls. Here’s a good rule o thumb:
Only override allowsVibrancy if your view or control does its own custom drawing.If you find yourself messing with allowsVibrancy of a view that you do not do drawing for, it is likely that the root of the problem you are experiencing is elsewhere.
Why is this dangerous / not recommended? A couple of reasons come to mind:
- Vibrancy is propagated down the view hierarchy. If a view is rendered using a vibrant appearance, its descendant cannot “turn off” vibrancy, which can lead to subtle or less subtle issues.
- It is easy to alter the look of a standard view and control subclass in a way that works for a particular use case. At some point later, you may end up using the same subclass elsewhere in your view hierarchy, and will have to investigate why it doesn’t look quite right. (Or worse: you won’t notice, but your users will.)
Problems
Issues occur when you accidentally make a view that does not support vibrancy use a vibrant appearance. (I am, of course, assuming that we’re all past using hard-coded colors at this point, but I recommend checking for that first, especially in older codebases.)
This problem can commonly happen if you add your view that does not support vibrancy (or is not designed to support it) as a descendant of an NSVisualEffectView. Being aware of the side-effects of doing so, which I outlined above, can help avoid most of these problems, and use the implicit behavior to your advantage.
Debugging
The inspector pane in Xcode View Debugger shows the explicit and inherited appearance of any selected view. Therefore, it can be a great tool for debugging appearance and vibrancy issues.
It is especially helpful if you can induce a condition where a part of your UI is rendered in an expected way. That way, you can isolate the likely issue by comparing the expected and reproducing cases, and then investigating the differences between their properties.
Appearance Customization
When looking to achieve the desired appearance for your views, it is a better approach to look for and reason through the root causes for the problems you’re observing, instead of attempting to patch them by assigning explicit appearance to your views.
But wait – again! Assigning an explicit appearance could cause unintended side-effects with Dark Mode and various Accessibility settings like Reduce Transparency. It’s somewhat common to fall into the trap of using the NSAppearanceNameAqua appearance to patch over any unneeded vibrancy. Using an explicit appearance name will not handle any of the above cases. Unless you’re prepared to handle everything yourself and would like to maintain the duplicative infrastructure, it is advisable to look elsewhere first.
If you must override the appearance of a view that customizes it in a way that is undesirable to your use case, consider the following:
- The
appearanceproperty onNSViewcan be assigned to directly – you need not subclass the view to customize its appearance, in contrast withallowsVibrancy. - Avoid explicit appearance names if you can, and consider (and test!) side-effects if you can’t.
- The
bestMatch(from:)method can be your friend here to let the framework machinery choose the most appropriate appearance from the list you provide.
- The
- If you need a shorthand for “the effective non-vibrant appearance”, you should consider using the no-argument
NSAppearanceinitializer before resorting to any more complex solutions. As always, verify with a variety of system appearances before concluding that you’ve solved an appearance issue.
Conclusions
Working with translucency and vibrancy can make UI truly come to life. Implementing them correctly may be a bit mysterious at first glance, but can always be made sense of after poking around the framework and the tools at our disposal.
Core principles to guide your future translucency and vibrancy endeavors:
- Content overlaid over
NSVisualEffectView-> no vibrancy; content added to the view hierarchy of anNSVisualEffectView-> vibrant appearance. - Beware of views that do not or are not designed to support vibrancy inheriting a vibrant appearance.
- Do not patch vibrancy holes by overriding
allowsVibrancy(unless you do custom drawing). - Avoid explicit appearance names if you can, and consider Dark Mode and accessibility.
- When you see a vibrancy / appearance issue, remember that the View Debugger is your friend.